Pin Float Problems? Here’s How to Fine-Tune Your Draw Length
Draw length is possibly the single most important factor in establishing proper shooting form. A optimized draw length will directly impact how steady you can hold your pin on the target. Finding your correct draw length will drastically improve your shot process and will translate into tighter groups down range. In this article I’ll explain how to identify, find, and fine tune a draw length that fits you perfectly.
Why do so many people have the wrong draw length?
It doesn’t take much research to learn that most people have a draw length that is too short for them. Most archers get their first bow before they are fully grown. As their body grows, their draw length often doesn’t. They get used to a certain draw length and slowly tweak their form to compensate for it. If they were to increase their draw length, they may find that it feels too different and that the immediate result is worse groups. However, for most people, if they give themselves time to settle in to a correct draw length, they will find that their shooting and steadiness will drastically improve.
Personal draw length issues
I had my draw length set at 27.5 for years before I learned that I need it to be an entire inch longer. I felt like my pin float and steadiness was really good. However, I didn’t know how good it could actually be because I had never shot a bow that was set up correctly for me. Years of shooting with the same draw length made me comfortable with where it was. But I eventually checked my draw length out of curiosity. What I found was a form flaw induced by a short draw.
Self diagnosing draw length issues:
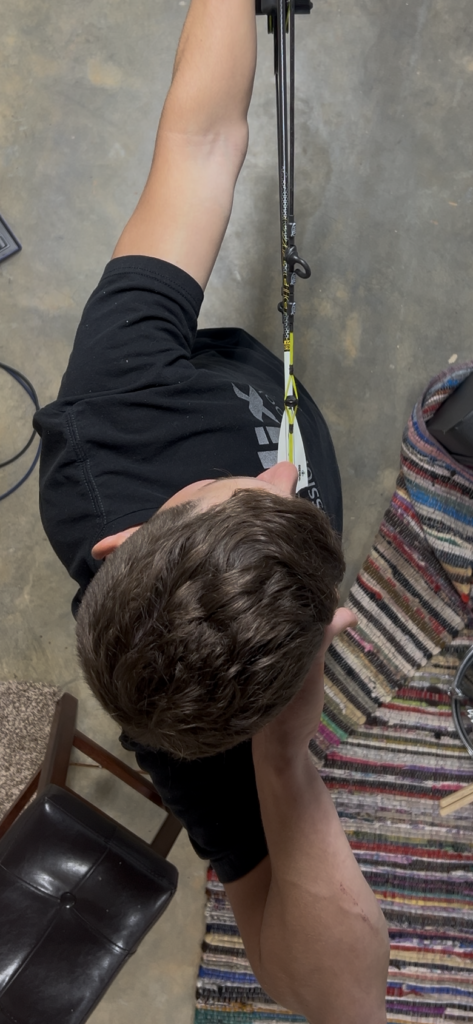
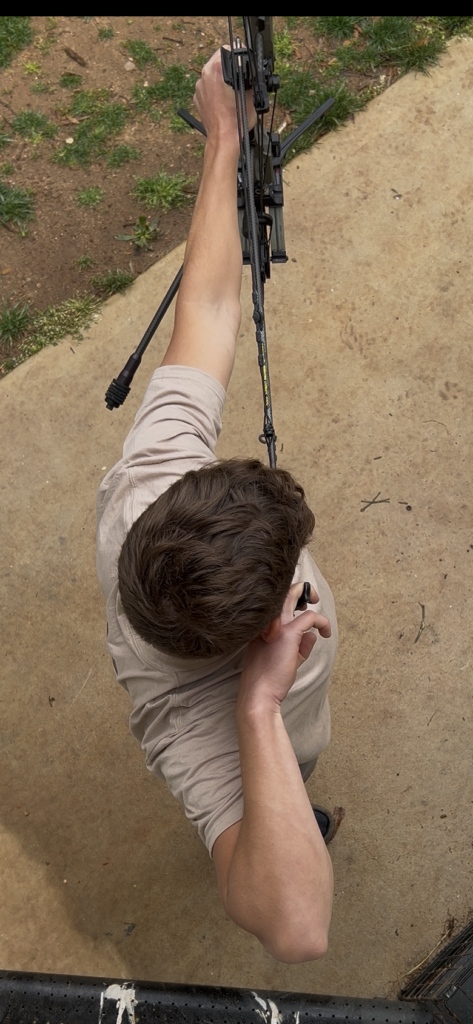
Watching how your pin floats and moves on target can give you a great indication of whether or not you should shorten or lengthen your draw. A tight, unpredictable, and erratic pin float often indicates a draw that is too short. Likewise, a wide, slow, and predictable float can indicate a draw length that is too long. I discovered my draw length was too short when I began to take videos and pictures of myself shooting from various angles. The most telling camera angle I have found is from directly above. From this position you can clearly see where the fore arm on your release arm is pointing in relation to your arrow. Ideally your right fore arm will be straight in line with the arrow. This ensures that the pressure you exert backwards is directly inline with your target. This will typically create the least amount of pin movement because your release arm won’t be pulling off-center from your arrow. As you can see in the picture example of a short draw length, my left shoulder is bunched up and compressed. Any compression or tension in your body will create instability at full draw. A proper draw length aims to alleviate all tension in the shooter’s body.
So how do you actually find your correct draw length?
Well there are two common methods that can get you close: the wingspan method and the Dudley method. (These are not for fine tuning your draw length to find what gives you the best pin float. I’ll cover that later in this article)
Note: When you take these measurements it’s important to keep your shoulders relaxed and low. This will put your shoulders in the optimal position for proper shooting form.
The wingspan method:
First, measure your wingspan from finger tip to finger tip with your shoulders relaxed and low. Take this measurement and divide it by 2.5.
Example: my wingspan is 68.25 inches. So 68.25/2.5 = 27.3.
There’s a big problem with this however; my draw length is actually 28.5-29 inches. So why the discrepancy? I believe it comes down to finger length. When you hold a bow with your bow arm(the left hand for right handed shooters) the bow’s grip contacts your hand in the palm of your hand, not the tip of your finger. So, for a person with short fingers, the wingspan method reads much lower than what my actual draw length is. This method may work for most people, but it’s important to not rely entirely on this method alone (or any method for that matter).
The Dudley method:
John Dudley has a great video on how to find your draw length using his method which I will link here: https://www.youtube.com/watch?v=oG0nb01SGMA. For this method, you will stand 90degrees to a wall that is on your bow arm side. Keeping your shoulders low and relaxed, raise your bow arm towards the wall. Make a fist and slowly move towards the wall until your fist touches the wall. Now, keeping your head upright and in a relaxed position, simply turn your head towards the wall. Measure from the wall to the right corner of your mouth(for right handed shooters). When I use this method I get a measurement of exactly 28.5inches. I prefer this method because it does not factor finger length into the measurements, but you may find that the wingspan method works better for you. It’s important to experiment and try different methods to give yourself a proper understanding of what your anatomy is and how it affects your form.
Now for the fun stuff: Fine tuning your draw length.
This is where you can really improve how steady and predictable your pin float is. By making small adjustments to your draw length, you can drastically reduce the distance your pin floats on target. Draw lengths on bows are not infinitely adjustable typically. They typically can either be adjusted in 1/4 inch to 1/2 inch increments. But you may find that you fall in between the draw length adjustments that your bow provides. So what do you do? Well, fortunately there are ways of micro adjusting your draw length.
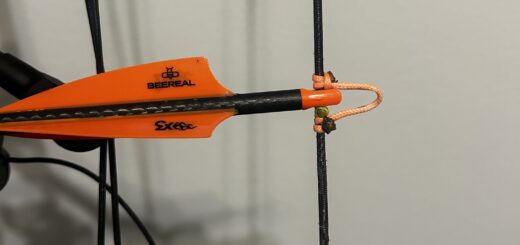
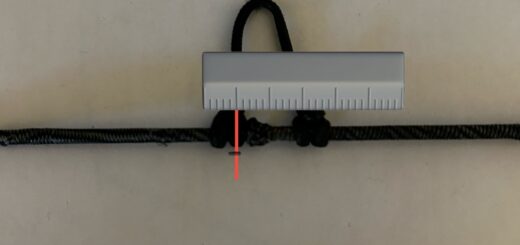
Try a different release or adjust d-loop length:
If you prefer a handheld release, you can try a new one with a different length neck. Or perhaps you try a longer or shorter d-loop length (Learn how to do this here: https://archeryethos.com/how-to-tie-a-d-loop-like-a-pro/ ). These methods can work well but they may have an effect that you don’t particularly care for. A new release may not feel right, and most people don’t recommend a d-loop length of less than .5inches or more than 1inch. So we have to turn to the strings and cables on our bow in some cases to find the draw length that we want.
Manipulating string twist to adjust draw length:
By twisting the string tighter you can decrease the draw length, and by twisting the cables tighter you can increase the draw length. This does require a bow press in order to take your string/cables off and twist them. Keep in mind that twisting the cables will affect your bows timing, and twisting the string will change your peep sight orientation, so it’s important to check your timing as you do this and to understand that you may have to flip your peep in the string to get it set correctly(tip: three full string twists will usually flip your peep all the way around so that it is oriented correctly again). It’s also important to note that taking twists out of a string or cable does have the potential to untwist the strings serving material, therefore it is recommend to only add twists to your string/cables.
I hope you have found this article helpful. As with everything I post, please feel free to provide additional insights related to the post in the comments. I don’t know everything and I could have gotten something wrong or over looked something important in the article. So, don’t hesitate to enlighten me and fellow readers with your own insights. Thank you!